Node.js Voice Quickstart
Objective: Build a simple Node.js application that answers a call and says “Hello, World!” to the caller.
Overview
- Step 1: Create a FreeClimb account
- Step 2: Create a Node.js application to play a message
- Step 3: Connect your Node.js application to FreeClimb
- Step 4: Test your application
More resources
- Explore the possibilities with FreeClimb
- Explore more advanced capabilities with FreeClimb SDK and PerCL
Go to the FreeClimb create an account page and sign up for an account using either your business email or GitHub account.
After signing up, you’ll be prompted to verify your email and phone number (US only). You’ll receive an SMS confirmation code.
Enter the confirmation code, and you will be taken to your FreeClimb dashboard. Here, you can manage your account, add applications, configure phone settings, and review call logs.
Click on FreeClimb Numbers in the left sidebar. You will see your free FreeClimb number that comes with the trial account. This number has been automatically attached to “My FreeClimb Application.” You are now ready to move on to Step 2.
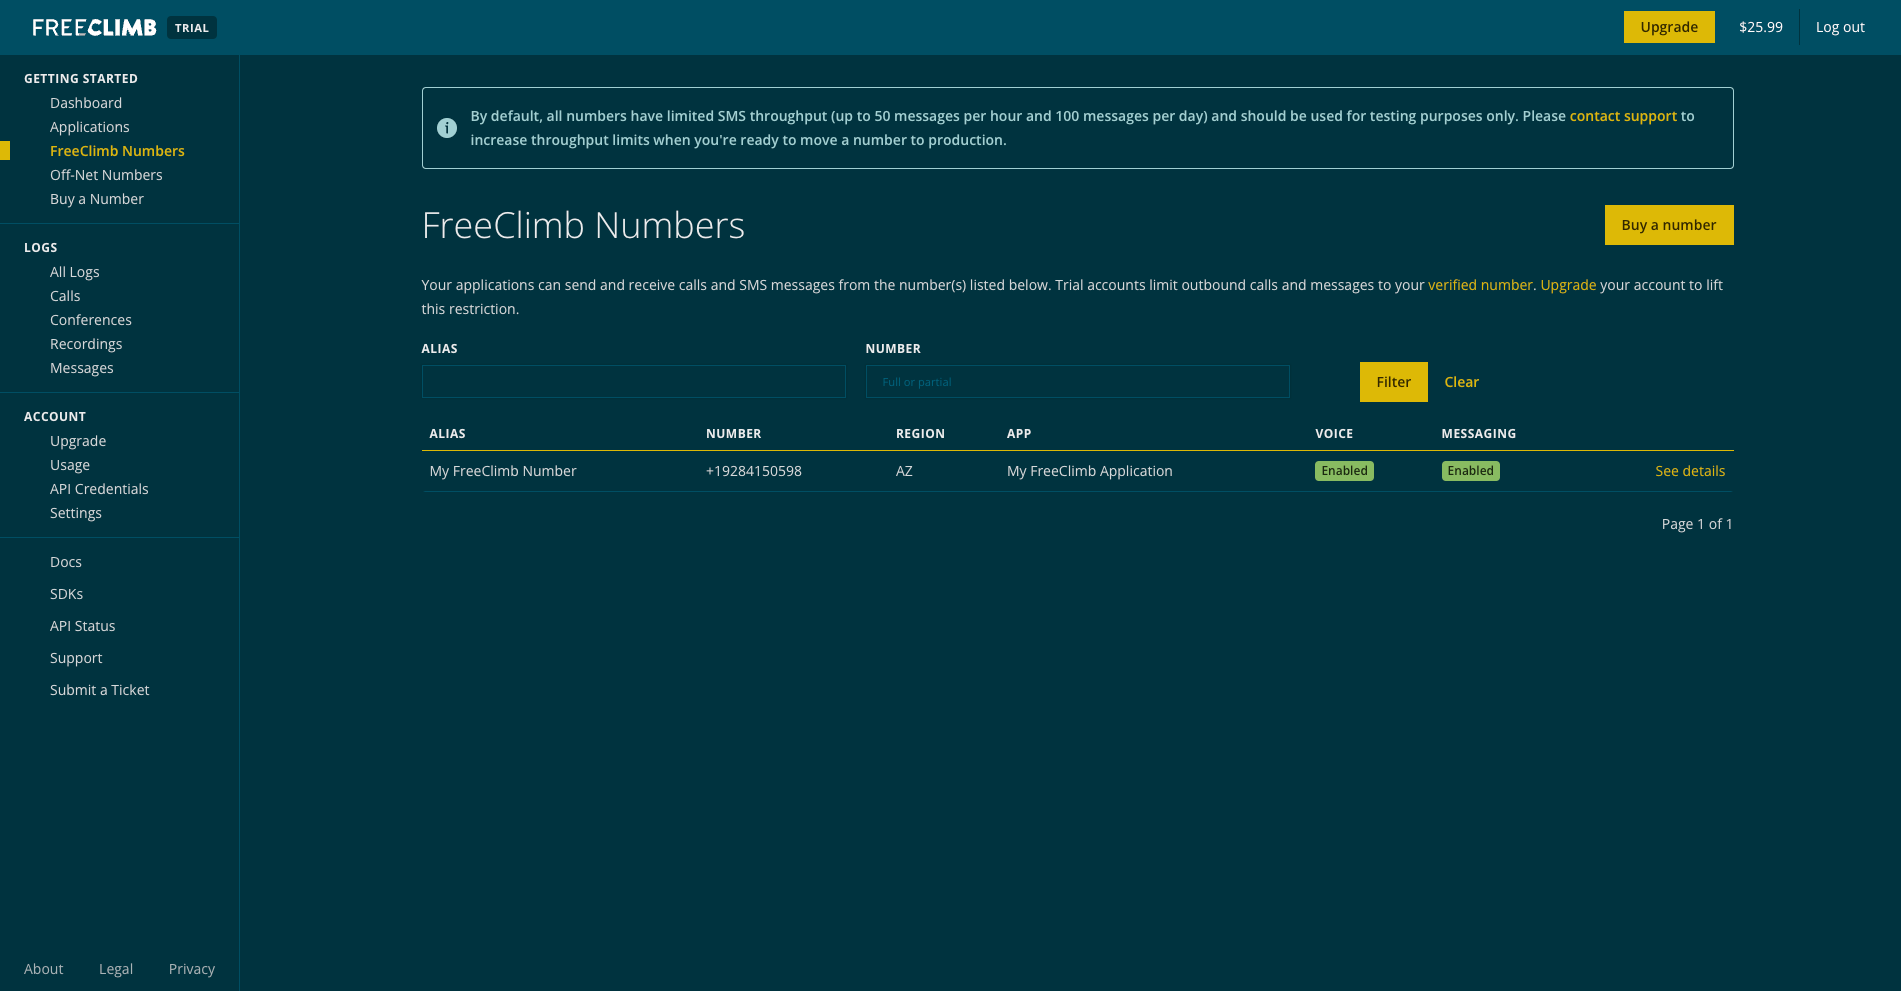
What is my FreeClimb number?FreeClimb numbers are regular phone numbers that you can dial from any mobile or landline phone. When a call is received, FreeClimb picks it up for you and forwards it to an application.
FreeClimb applications are the interface between your code and the FreeClimb backend, which handles the transmission of data between the Internet and telephone networks. FreeClimb will connect your App ID to a FreeClimb telephone number so that it can correctly direct incoming and outgoing voice data
For this step, the goal is to get a Node.js application running on a public URL so it can be connected with FreeClimb in Step 3. We provide two options to accomplish this: running the application on CodeSandbox or running the application locally.
CodeSandbox is a great option for exploring FreeClimb in just a few clicks without the overhead of installing, building, and hosting an application. If you’re ready to build your own application, then running it locally may be a better option for you.
Please choose one of the following options:
Option 1: Run the application on CodeSandbox
To run the application on CodeSandbox, copy the public URL below and move on to Step 3.
https://6jdpsl-3000.csb.appIf you wish to further explore CodeSandbox, check out the Node.js CodeSandbox. Once you've created an account or logged into your existing CodeSandbox account, you have the option to fork these sandboxes for further customization.
Please NoteCodeSandbox is not suitable for production level applications.
Option 2: Run the application locally
To run the project locally, you’ll need to clone the Node.js Voice Quickstart project from GitHub to your local machine by using the following command:
git clone https://github.com/FreeClimbAPI/Node-Voice-Quickstart.gitInstall the required packages:
yarn installStart the application:
yarn start
Using Docker instead?Follow these instructions:
- Pull docker image from dockerhub
docker pull freeclimbapi/node-sms-quickstart
- Run docker image after replacing placeholder values
docker run -e ACCOUNT_ID=<YOUR_ACCOUNT_ID> -e API_KEY=<YOUR_API_KEY> -e FREECLIMB_NUMBER=<YOUR_FREECLIMB_NUMBER> -p 3000:3000 freeclimbapi/node-sms-quickstart
Next, go to Ngrok and click Download.
Unzip the file to install, then open your terminal and navigate to the directory where you've unzipped ngrok.
Start an HTTP tunnel on port 3000 with the following command:
./ngrok http 3000Once you run ngrok, you should receive a response that looks something like this:
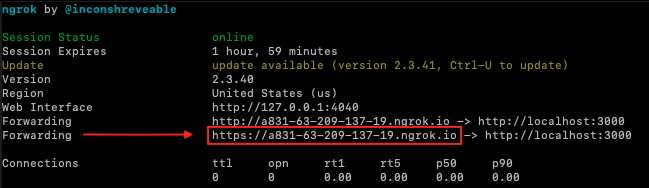
The Forwarding URLs point to your local server. Copy the URL and move on to Step 3.
You’re now ready to tell FreeClimb how to find your application so that it can route calls to your application's public URL.
Return to your FreeClimb dashboard and click Applications. Click Edit Config next to the “My FreeClimb Application.”
In the VOICE URL field, enter the public URL you copied in Step 2 and add /incomingCall to the end of it. See the image below. Click Update to complete this step.
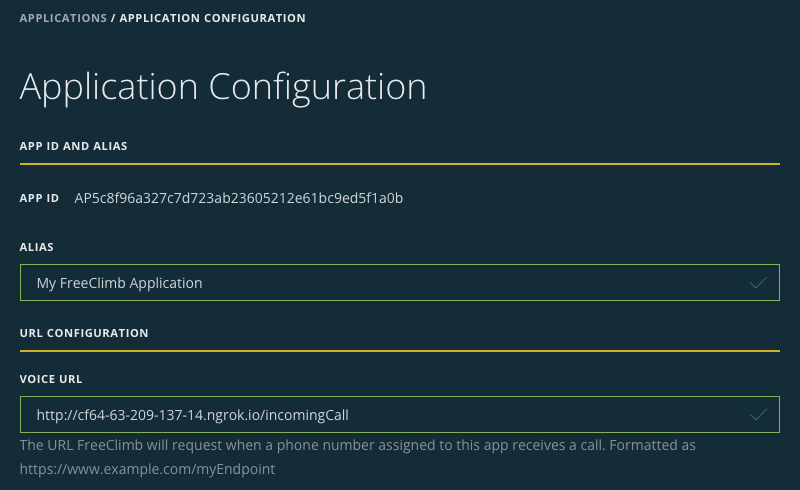
Please NoteThe beginning of your VOICE URL will be unique and different from the one shown in the image below.
Use the phone connected with your verified number to call your FreeClimb number. You should hear, “Hello, World!”
If you didn’t hear this, click on All Logs in the lefthand menu on your FreeClimb dashboard. Here you will see a history of your calls and a description of the event under “Message.”
If you see a log that reads, “The FreeClimb Application assigned to this phone number has no voice_url set,” then you need to repeat Step 3.
If you see a log that reads, “Request to Application,” this means that your application and FreeClimb are communicating, but your application is not responding correctly. Check for errors in index.js
If you do not see the incoming request in your Logs, check the following:
- You’re calling from a verified number.
- Your FreeClimb Number is connected to My FreeClimb Application.
- The Voice URL in your app config is the correct public URL, with /incomingCall added to the end.
Need additional help?Please reach out to our support team.
Now that you have completed the Node.js Quickstart tutorial and experienced a successful “Hello, World!” moment, feel free to explore more of FreeClimb’s capabilities.
FreeClimb is highly scalable and reliable and is built on a proven platform. While setting up a simple voice application is straightforward, it is the first step towards building an application that can reliably handle large volumes of telephone calls and increasingly complex business logic for call management. Here are some suggestions for further exploration:
The message you heard came from the following lines in index.js:
const script = new PerclScript({
    commands: [new Say({ text: "Hello World! " })],
  });

res.status(200).json(script.build());- Modify the “Hello World!” string and you’ll get a different message. The linked PerCL document in the next section provides more insight.
- If you’re looking for more options for different types of responses for voice calls, read our Accept an Incoming Call tutorial.
- Learn more about outbound calling, SMS functionality, and conferencing capabilities.
- Visit our FreeClimb Docs to learn more about how FreeClimb can benefit your business.
Your Data is SafeFreeClimb meets industry standards for handling sensitive user data, including PCI and HIPAA.
The FreeClimb Node SDK includes support for Performance Command Language or PerCL scripts. The client-side application in a FreeClimb application is the FreeClimb platform, which handles a different data format than a typical web application. PerCL is a scripting language that converts between JSON-formatted data and audio recordings and gives the commands to transmit that data back and forth between web applications and the telephone network.
In this tutorial, PerCL is used to turn a text string into an audio message that we then play for the caller. The SDK enables you to write that PerCL script directly in Node.JS.
The business logic of the sample application is contained in the index.js file. We have a single route for now since all this application will do is answer incoming calls with a static message:
- There is a single route for a POST method called /incomingCall which holds all the logic for our sample app.
- We start by using the FreeClimb SDK to create a Say script in PerCL. The Say script only needs a text string as a parameter, which will be read to the caller.
- If the endpoint is successfully accessed, we use the SDK to start the PerCL build. The script then returns a custom success message containing the result of the PerCL build in JSON, and relays our “Hello, World!” message to the caller.
Updated 6 days ago